Showing posts with label birthday. Show all posts

Monday, 23 May 2016

Birds.

It's been a while since I posted anything here.  In fact, the last post was about Anna's birthday.  So's this one...
I found some nice watercolours of birds in a local shop.  I thought they'd make a nice pressie.  Then I thought I'd have a go at doing them myself (while keeping the shop ones in mind as a competent backup!).
Having not done watercolour before (or at least, not since school days!) I had to go and get some kit (don't worry, I had a £5 off voucher).
Once kitted out, I had a few practice rounds:

Then I did four paintings (three based on what I'd seen in the shop, one from a bird book we have):

The goldfinch is probably my least favourite (sorry goldy) and was the one that relied on the book.
 I think it looks lie a crow in disguise, perhaps because of its beak...
There's the diminutive wren, not exactly vibrant, but I thought he was quite sweet:
The blue tit seems to have a nervous twitch, but is blessed with a little more colour than the wren:
Then my favourite, the robin:
So there we have it - really quite enjoyed trying my hand at some watercolour! 

Saturday, 8 August 2015

Feeling heartistic.

This was a post that should have appeared in May, but it didn't.  Or June or July, for that matter.  But, as usual, I'm opting for the 'better late than never' approach.
As you may be aware, we run a boarding house.  The girls wanted to buy Anna a birthday present and found a lovely site (on something like 'notonthehighstreet') that made customised heart pictures with maps of places that hold special meaning for an individual.  There was a frame with three hearts in, and the girls decided that maps of Jersey, Durham (where Anna and I met at uni) and Repton would fit the bill perfectly.
There was only one slight problem with this plan.  The site in question charged about 80 kazillion pounds for said piece of work.  And the girls didn't have 80 kazillion pounds available.  Thus plan B came into action.  I popped down to Hobbycraft and bought the following items:
---------------------------------
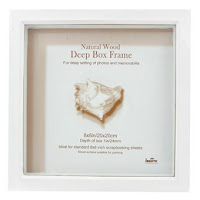
3 deep picture frames (although I found plain wood ones, rather than white ones)
Link to hobbycraft website
3 chalkboard hearts (ok, so I actually bought more than 3, in case things went wrong)
Link to hobbycraft website

I also bought some UHU (I'm sure other glues would have done the trick) and some plain beige-ish card to be the backing material.
I then popped to Millets (which is a camping store) and bought Ordinance Survey maps which included Durham and Repton.  In the absence of any Jersey maps, I had to print something off on the computer, which may one day be replaced with a proper map. 
As we're in the middle of making a Go-Kart, we had some plywood available.  We'll come back to that later...
I also needed some scissors :)
--------------------------------------
And here's the process.
Cut the strings off the chalkboard hearts.
Put one heart on a map, with your desired location roughly central and draw a bit circle round it:
Stick the heart to the back of the map.  Personally, I stuck the map to the 'wooden' side.  ~You can make sure it's in the right place on the map by holding it up to a window, and ensuring you've got your desired location exactly where you want it before gluing it down.  Then cut around the heart, leaving about an inch and a half 'border'.
At this point, you could take the easy way out and trim the map hard up against the heart (possibly with a craft knife), but this means that the map won't wrap around the heart, and I personally didn't think that looked as nice when I tried it.  If you're wanting to do it 'properly', then your next job is to feather along the edge, cutting right up to the heart (perpendicular) and making each bit about 2 or 3mm wide.  Fold down all the way around, making sure the corners are as 'tight' as possible.
Add glue to the back of the heart all around the edge (it may be worth doing this in two stages, depending on how quickly you can work!).
You need to apply pressure from front to back and hold the strips in place until they stick.  This is a bit of a sticky bit, and needs to be done carefully to ensure that the edge looks neat.  Because of the curve of the heart, the strips will overlap in some places (and may need extra glue) and will be splayed out in other places.
Once you've finished, it should look a little like this:
Give it some time to dry.  You'll now need some plywood or equivalent.  I cut little triangles of the stuff.  You need to stick a triangle to the back of the heart, ideally so it's not really visible once it's put in the frame.
(Yes, I know this picture is of a different map and heart than the others - I forgot what I was doing and stuck the first one onto its backing card before taking the relevant photo). 
Once you've done this bit, you're almost there.  The final bit is to cut your backing card to size, stick the heart to the middle of it, and frame it.
One reason I chose to do all this in separate frames was that more frames could be added if we ever moved :)
Here's how they look above our dining room doorway:

The girls were very happy with the outcome (and the price!) and Anna was very pleased with her birthday present.

Tuesday, 14 December 2010

Rex.

Well, last year it was a pirate cake. This year he announced that he wanted a dinosaur cake. Specifically, Rex from Toy Story.
So here's a little outline of how it went. First, bake a cake in a sort of A4 sized tin. Just did an all-in-one sponge myself (Delia's, if you must know...) for this purpose. Then, draw a template on a bit of A4 paper. Look at the template, appear shocked at your own lack of artistic prowess, get another piece of A4 and try again. Finally, after a few tweaks, and some internet based research, you'll have a template you can show in public. Place this on top of the cake. Sorry this first photo's upside-down. Wasn't really thinking at the time.

Next, get a sharp (and, ideally, quite narrow) knife and start cutting out the template. You'll notice that the tail on the template is somewhat foreshortened. This is because I was intending to salvage a bit of cake from the offcuts to form into a tail. In fact, in this second picture, you can see the gap where the tail has been taken from. If I was thinking, I'd have cut the tail the other way, so that it was the same way up as the body. But I wasn't, so it wasn't...
When you've finished that part of the operation, you'll hopefully have something that looks like a cross between a dinosaur and a lizard who's shed its tail. I have to confess I didn't really try to make 'hands' for Rex's front limbs. Neither the knife nor the cake looked like they were going to be up to that sort of detail.
It's now ready to be transferred to its final resting place. In this case, a chopping board covered in tinfoil. Classy stuff. At this point, add the tail. (see - it's the wrong way up...)This is the fun bit. Make some green icing. Now, I looked at the green colouring and thought to myself that it would be pretty easy to get it to Rex-green. However, I ended up emptying the bottle into the icing and it still wasn't green enough. I tried a few drops first, then a lid full, then another, then just tipped the remains of the bottle in. Still ended up with a bit of an insipid outcome. Hey ho.
Start slopping the icing onto the cake in vast swathes. It's not exactly for the faint-hearted, this cake. Obviously, at this point it would be a shame to find out that you've not made enough icing, as colour matching is notoriously difficult at such times. I went the other way and hopelessly over catered. Thankfully, one of the birthday party activities was cake decorating, so it didn't all go to waste.
Once you've finished off the icing all over bit, add some detail. This is another stage where my lack of artistic finesse worked against me, but I think that you can probably get the general impression that it's supposed to be a dinosaur. If you're wondering what on earth is going on with the '4' in the top right, it's because Joshua doesn't actually like icing (ironic, I have to admit) and so asked for a bit without icing. I didn't really want a 'bare' bit of dinosaur, so opted for creating a '4' out of off cuts, and holding it together with a bunch of skewers.
And there you have it. A Rex cake. In fact, one of the kiddies said, as I put the cake down, 'it's a dinosaur' (cue sigh of relief from me). Another kid responded, "it's Rex" (cue declarations of undying love from me!). Top of the class boy, well done.


As it happens, it was a year ago today that I wrote,
"I'm seriously considering starting a blog called 'man made' to start to try and balance the approximately 40 billion blogs out there that are craft by women for women - or at least with the assumption that only women will be interested :)

Sadly, if I did start such a blog, I think it would only be read by women..."

Here it is :o)