Monday 27 December 2010

Slated.

Just a quick one this time.  It's all about table mats.
We've wanted some slate table mats for ages.  They tend to go for about £15-20 for 4-6 placemats.  (In fact, I've just checked and it seems to be £20 for 4 for the bottom-of-the-range)
So, we figured we could do better.
Trip to Build Base (I was actually looking for an architectural salvage yard, but found BuildBase instead, and they did reclaimed slates)
Buy 20 slates for 62p each (and have an extra 5 thrown in for free, because some are a bit damaged)
Go to Dunelm Mill and buy a fleece blanket for £4.99
Get home and chop the blanket into slate size squares (it's a bit tricky, because fleece is a bit of an awkward fabric to work with)
Following the example of the Nester, who seems to have a fascination with glue guns that verges on fetish, hot glue the fleece to the slates.
Hey presto, you've got yourself a whole bunch of tablemats for less than £1 each (including slate, fleece, and glue for glue gun)
They are pretty heavy, which makes carrying them all at once a good workout.
The only down side is that the slate 'splinters' easily, so we have lots of shards on our table cloth.  However, I reckon this would be solved by varnishing them, which I may or may not get around to doing one day.

A quiet Christmas Eve?

So, the presents are wrapped, the mince pie and carrots are out for Santa and co., and everyone's looking forward to a chilled evening, after putting the boy to bed.
"Where's the stocking?" seems like such an innocent question to throw into the ether.  But after a hasty search results in no stocking, a full scale search and rescue effort is mounted.  Again, no joy.  Not so much as an old sock.  Solution?  Well, make one of course.

Bits:
Fabric (in this case, red stuff from a bean bag (yeah, I do seem to make loads...) for my sis-in-law) for the stocking itself.
Some white felt/fleece (in my case, it involved butchering a pair of white stockings (no, they wouldn't have worked for Santa's offerings!) that we'd bought the boy last year for his role of '7th sheep' in the nativity, only for him to refuse to take part)
Some black felt/fleece (as it happens, we had some lying about from the table mats - a different post altogether...)
Thread
Sewing machine (if you don't fancy doing it by hand, that is)
Fabric glue.


Grab a piece of fabric that's sort of squarish, and sketch a stocking shape on it that you're vaguely happy with. 
Cut this out. 
Use this as a template to make the other half (though remember that if you've chosen a fabric with a 'front' and a 'back', you'll need to make sure that you end up with both the 'fronts' on the outside of your stocking (unless the look you're going for is 'weird') and this will require you to cut the shapes out the right way round!
Cut the other half out (if you ignored my advice above, and now discover you have a 'front' and a 'back' that stick together, try again!)

Hem the tops of your stockings.  This will just mean that there's no taggy bits on the top - everywhere else will take care of itself.
Put them front to front (maybe I should mention at this point that I chose a fabric that didn't really have a discernible front and back, so less care was needed...)
Sew them up, using your sewing machine (or your mother, or whatever works best, really)

Turn your stocking inside out.  It should now be neat and tidy.
Next, cut out some bits of your white fabric (felt would be best, if you want to avoid butchering things) into circles.  One big for a snowman's body, one smaller for his head, and then a whole load of small ones for snow.
Glue all these onto the stocking, then cut out detail bits from the black fleece.  I went for a top hat, three buttons, a nose and some fluff for his pupils.
I didn't mention the blue fabric earlier did I?  No, that's because this was the point in the operation when I realised I needed it, so I figured you didn't need to know in advance either.  Now, I was a little bit shocking here in choosing my fabric donor.  I went to the cupboard where we keep his too-small clothes, found a blue polo shirt from his school uniform and, where there's a double layer of fabric at the top of the back, I cut out two small circles from the inside of the polo shirt.  No-one will ever know...  These were also glued to the snowman, along with the black bits.
Next, stop at the top of the stairs for an impromptu photo shoot with your stocking.
 Finally, hang the stocking up on the fireplace.  Yes, that is a real fire - I don't think my camera phone has really done it justice.  That and the fact that the wood's a bit damp...
Of course, you could add more decoration, trees, stars, angels and the like.  In fact, if you were talented, you could probably go the whole hog and hot glue a felt nativity onto it.  But that's out of my league :)
You can now enjoy the rest of your Christmas eve in peace.  (It took just over an hour, if you're wondering.)

Tuesday 14 December 2010

Rex.

Well, last year it was a pirate cake. This year he announced that he wanted a dinosaur cake. Specifically, Rex from Toy Story.
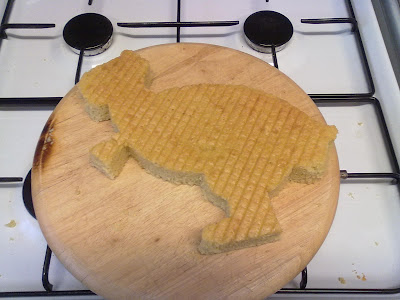
So here's a little outline of how it went. First, bake a cake in a sort of A4 sized tin. Just did an all-in-one sponge myself (Delia's, if you must know...) for this purpose. Then, draw a template on a bit of A4 paper. Look at the template, appear shocked at your own lack of artistic prowess, get another piece of A4 and try again. Finally, after a few tweaks, and some internet based research, you'll have a template you can show in public. Place this on top of the cake. Sorry this first photo's upside-down. Wasn't really thinking at the time.

Next, get a sharp (and, ideally, quite narrow) knife and start cutting out the template. You'll notice that the tail on the template is somewhat foreshortened. This is because I was intending to salvage a bit of cake from the offcuts to form into a tail. In fact, in this second picture, you can see the gap where the tail has been taken from. If I was thinking, I'd have cut the tail the other way, so that it was the same way up as the body. But I wasn't, so it wasn't...
When you've finished that part of the operation, you'll hopefully have something that looks like a cross between a dinosaur and a lizard who's shed its tail. I have to confess I didn't really try to make 'hands' for Rex's front limbs. Neither the knife nor the cake looked like they were going to be up to that sort of detail.
It's now ready to be transferred to its final resting place. In this case, a chopping board covered in tinfoil. Classy stuff. At this point, add the tail. (see - it's the wrong way up...)This is the fun bit. Make some green icing. Now, I looked at the green colouring and thought to myself that it would be pretty easy to get it to Rex-green. However, I ended up emptying the bottle into the icing and it still wasn't green enough. I tried a few drops first, then a lid full, then another, then just tipped the remains of the bottle in. Still ended up with a bit of an insipid outcome. Hey ho.
Start slopping the icing onto the cake in vast swathes. It's not exactly for the faint-hearted, this cake. Obviously, at this point it would be a shame to find out that you've not made enough icing, as colour matching is notoriously difficult at such times. I went the other way and hopelessly over catered. Thankfully, one of the birthday party activities was cake decorating, so it didn't all go to waste.
Once you've finished off the icing all over bit, add some detail. This is another stage where my lack of artistic finesse worked against me, but I think that you can probably get the general impression that it's supposed to be a dinosaur. If you're wondering what on earth is going on with the '4' in the top right, it's because Joshua doesn't actually like icing (ironic, I have to admit) and so asked for a bit without icing. I didn't really want a 'bare' bit of dinosaur, so opted for creating a '4' out of off cuts, and holding it together with a bunch of skewers.
And there you have it. A Rex cake. In fact, one of the kiddies said, as I put the cake down, 'it's a dinosaur' (cue sigh of relief from me). Another kid responded, "it's Rex" (cue declarations of undying love from me!). Top of the class boy, well done.


As it happens, it was a year ago today that I wrote,
"I'm seriously considering starting a blog called 'man made' to start to try and balance the approximately 40 billion blogs out there that are craft by women for women - or at least with the assumption that only women will be interested :)

Sadly, if I did start such a blog, I think it would only be read by women..."

Here it is :o)

Wednesday 13 October 2010

Harvest time.

Not really sure where to put this blog, so I'll bung it here, and then link it to the 'outdoor blog'.
It's apple season. And that means lots of work to do in the orchard.
In particular, it's a bit of a race to actually pick the apples before they drop off. When an orchards is as chronically neglected as ours, the trees have grown too big, and a drop to the ground generally proves fatal (or at least bruising) for the apples.

Solution? Well, you need an apple picker. Such as this fine one from Harrod Horticultural (no, they're not paying me for that plug!). Harrod Horticultural is one of those websites I window shop around from time to time, dreaming of the old lottery win scenario, where I can then afford such items as this fine apple picker. "From 29.95" the website tells me. (Does that mean I can pay them more if I really want to?!)
Actually, if I'm honest, if I was the recipient of a windfall of cash, I'd try to avoid spending it on things like this, on the assumption that, if I didn't buy one before, the need can't have been that great... But that's another story!

Anyway, I'm digressing horribly from the point, which is, as stated before, "God gave me the same hands as he gave to the bloke (or woman...) who made that, so I may as well make one myself".

So I had a crack at it. I figured a wire coat hanger would make the 'frame' bit (the red bit in the picture above) as I could bend it in and out to make the 'teeth'. Sure enough, that was a cinch. Then I had a think about an appropriate bag type thing. The prototype had a bubble-wrap catcher. This was then taped to a bamboo cane, to give good reach. Ok, so it doesn't look as pretty as the one on the open market, but it's got a certain charm... No, actually, it hasn't - it's very ugly. But the main thing is, it has a USE! I went straight out to the orchard and gave it a go. There were a couple of slight issues, like the taping had been done fairly haphazardly, which left some gaps for leaves to get trapped in. But other than that, it was a good first try. On my way back into the house, I spotted the pole for the washing line. It's autumn, I thought to myself, and that pole won't be needed for a good long while now... So, having made a successful prototype, I moved onto the first 'production' model.
Again, there was a wire coat hanger involved. This time, however, I buzzed the sewing machine around a bit of scrap cloth I had in the box. I then sewed this onto the coat hanger (this seemed a little more refined than masking tape. Finally, the 'basket' was taped (perhaps some nice garden twine could have been used...) to the washing line pole. And here's the result. I was (arguably over-) excited by the outcome. The lads who come to pick apples for us on a Wednesday referred to it as 'insane'. Now, being one who's 'down with the kids', I interpreted that as a positive thing. But maybe they are just concerned about my mental health...

Sunday 3 October 2010

Books. Lots of 'em.

Saw this yesterday.
That's a lot of books about craft.
I didn't buy any. Some were tempting though.

Sunday 12 September 2010

A little chicken.

So here's the latest contribution to the 'man made' effort...No, not the boy (though I did play a part in his creation...) The chicken thing he's holding. It's a puppet. He's not really got the hang of it yet (no pun intended), and it gets easily tied up in knots when wielded by a three-year-old. However, he said to me, 'Daddy, your chicken is brilliant', which is good enough for me.
He was *supposed* to help me make it, but didn't hang around for more than about 3 minutes at at time. He drifted back occasionally, but preferred his scooter to his crafty daddy.

The design is granny's. Well, I say it's hers, but I think she got it from elsewhere. She would often see things in shops, declare, "The Good Lord gave me the same hands he gave the person who made that, so there's no reason I can't do it myself", and then go home and make one. Great policy (unless you were the person who was trying to sell stuff to granny!) and one that I've sort of been nudged towards myself :)

The ingredients are:
some wood (either ply type or solid) that's probably about 7mm thick (haven't measured it)
A strip of wood for the 'handle' bit you hold it by
some cord (I bought some thickish stuff from Dunelm, but it has to be able to fit though the wood, and through the hooks)
a bunch of those hook things that aren't hooks, they're all-the-way-round. I used two different sizes because the cord was too thick for the smaller size (I also found they're flippin' expensive!)
Some thread.

You cut two feet that are trapeziums (trapezia?). Look here and imagine that line 'h' is one side, so it's got two right angles and two not-right-angles... Having said that, the picture there is a bit long. It probably doesn't matter too much. Try it with card first, if you're worried, and see how it looks. Each foot needs a hook in it, roughly central so it stays levelish when lifted off the floor.
The head is a pointy right-angled triangle. It needs a hole drilled top to bottom. You can probably see from the picture that it's near the right-angled side of the triangle, and you want the to of the head vaguely parallel with the floor.
The body is effectively a bigger triangle, but with the pointiest end trimmed off. This needs a hole drilled in it, about half-way up, near the 'back'.
You then attach the 'legs' to one foot, pass the cord through the body and attach the other end to the other foot. Don't tie both ends to a foot without passing the cord through the body - you'll feel like a right numpty. I attached mine by tying knots beyond the hook (as opposed to tying them to the hook) because the cord was thick enough to not then fit back through the hook. You may need to 'seal' the end of the cord (whip it).
For the neck, attach a hook to the front of the body (as in, sticking out of the front, not on the top or bottom edge of the body) Attach one end of cord to this (same method as for the feet) then pass the other end through the hole you've drilled (do it now if you haven't yet!) in the head. Glue this into place with about an inch to spare. Once it's dried, unravel the loose end above the head for the bird's 'comb' bit.
Lastly, get the little strip of wood. You'll need two bits, each with a hook at each end. Attach a hook at the back of the body, on the top edge. (You may also want to have one on the head next to the comb, though you could potentially just semi-whip the base of the comb and have a long bit of thread left from this...) Tie thread to the foot hooks and the body and head hooks.
Tie one foot hook to one of your 'handle' hooks, at a sort of sensible length. Tie the other one on, ensuring it's the same length.
At this point, it's worth joining the two 'handle' strips together. I attached the foot hook about a third of the way from the head end of the head-body strip. (Are you getting all this?!)
Now you can attach the last couple of threads, ensuring that the birds looks roughly right when the 'handle' bit is all level.

Play.

(And then, soon after, untangle it...)
Oh and the thread might occasionally come off the hooks ... Uh ... just tie it back on.
And if it's really tangled, just undo a couple of threads and that will make it easier to untangle...

Sunday 29 August 2010

Planting boxes.

Well, I made these yonks ago, but never got around to blogging about them.

They're old pallets. I just ripped them apart and screwed/nailed them back together in a different way. Simple enough.
Having said that, I couldn't find my crowbar, so had to use the claw hammer. A crowbar would definitely have been easier.
They were supposed to look weathered and rustic, which they do. (Cheap?!)

If I were to do it again, I would probably line them with plastic sheeting so that they're not so free draining. The problem with their current site is that, although they're outside, they don't seem to get rained on because they're just sheltered by the patio roof (unless it's raining and very windy in their direction!). The plants have suffered a bit from lack of water while we've been away. That is to say, the sweet peas very nearly died altogether, and the tomatoes weren't happy with our disappearance.
Hey ho, it's all a learning curve.
If you're wondering, both the tomatoes and the sweet peas are 'trained' up a piece of string which hangs vertically (gravity to thank for that...) from a horizontal piece of galvanised wire that runs between the pillars either side of the box. (You can see one pillar in the shot). The wire is probably about five or six foot from the box.
The bits of wood that fell apart during the ripping-apart process are very useful as kindling for the log fire.

Tuesday 8 June 2010

bread, pate and hula hoops.


Raw talent.
Nuff said.

Friday 30 April 2010

AAARRRRRRRR. Old hat.

Ok, so maybe it's lazy to do another bean bag post, but I have made another one, so why not eh?!

This time, the bean bag was for Joshua, and this is how it went...

Go to fabric shop to find fabric.
Fail to find it and resort to asking shop lady.
Follow shop lady to the (very) limited selection of kiddie fabric, but breathe a huge sigh of relief on discovering that there is some pirate fabric.
When asked how much you want, think to yourself, "oops, should probably have thought about this" and ask for three metres as a wild guess.
Thank the lady kindly when she gives you an extra end bit.
(I'll now skip ahead to the 'making' bit, so you don't have the whole day)
Think, "why bother with circles and trapeziums (see last bean bag), surely squares and rectangles will do"
Cut out two squares the same size. (If you're a 'details' kinda person, you might be interested to know mine were 70 cm square, but that's only because the fabric was 140cm wide and I didn't want to be wasteful)
Cut out four rectangles which have two sides the same length as the square sides. (again, 'details' - the other sides were about 56 cm. And when I say 'about' I really mean it - more of that later)
Start pinning bits together.
I pinned two bits to the top square first (I reckoned the top one was the more important to get right - if your fabric's got a right way up and a wrong way up, make sure it's the right way up)
Sew the bits on.
Realise that one of the bits you've just sewn onto the top square is, sadly, the bottom square.
Curse your own ineptitude
Turn your back briefly on your three-year-old (yes, I had my 'helper' again) only to turn back round and discover he's just cut one of the rectangles into bits. And yes, it was the one I'd already sewn on.
Chastise child (I'm not going into details here!)
Unpick shredded rectangle from top square. (Cursing child)
Unpick bottom square from top square. (Cursing yourself)
Realise you have lunch guests coming.
Do lunch (meanwhile, child, in his grief, has fallen asleep for an early nap)
Head back upstairs after lunch and look forlornly at shredded (and now unpicked) rectangle.
Vow that this can be redeemed.
Find cushion in cupboard that's just the right size.
Trim off all 'shredded' bits of the rectangle.
Turn shredded bean bag rectangle into new-life cushion cover with a quick run on the machine.
Wake child to show him your cushiwork, make up after the early disagreements and play.
(Skipping ahead again)
Start over with the pinning.
Realise you could have used two rectangles rather than four, and not bothered cutting them in half. (Depending on mood, either smile or feel glum about this)
Start sewing.
Make sure you get a zip in there somewhere (I did it between the bottom and one side)
Wonder why you weren't more careful with your measuring, as the corners now don't really match up very well at all.
Steal the inside of another bean bag (otherwise the beans will all fall out of the corners that, as mentioned, haven't really worked...)
Fill the bean bag. Bear in mind that if you overfill a bean bag, you end up sitting on top of it, rather than sinking into it as you should!

Show bean bag to child.
Be thankful that he's thankful. (On that note, he's rather gone off Charlie and Lola - it's all Fireman Sam at the moment - if he thinks I'm doing another painting on his wall, he's got another think coming!)

If you're feeling adventurous, try out this once you're done.

Sunday 14 March 2010

Marvellous mural...

Or something...
Very pleased with this one. I'm glad to report that Joshua's a big fan of Charlie and Lola. Glad for two reasons. One, it's a fantastic programme, and I thoroughly approve of it (more than can be said for Waybuloo!). The other is that it's fantastically easy to paint onto a bedroom wall!
When Joshua wandered into his room as I was painting it, and saw it for the first time, he grinned broadly and said, "Charlie and Lola". (I'm glad he recognised them!) I was chuffed that he hadn't come in and burst into tears or anything, because that would have been somewhat annoying!
Very satisfying, and only took a couple (maybe three...) hours to do. The black outline was pretty time-consuming.

Wednesday 10 March 2010

A new home.


Ok, so it's not exactly huge, but it's still home (with a bit of luck, anyway...) for a couple just starting out :)


As usual, it was a joint operation involving me and Joshua. It's SO easy to make though. You just need a plank of wood and you chop it up. Roughly speaking, it's a long bit for the back (bearing in mind you'll be using this to attach it to the tree or whatever, so it's gotta be longer than the box itself) then a front with a 1 1/2 inch hole drilled into it, a base, the two sides cut at an angle, and the roof, which is from the same plank, just mounted sideways. In terms of dimensions, you just need to make sure it all fits together using your chosen sizes. As you can see from the pic (if you click on it it's bigger) the front and back are 'inside' the sides, which means the roof fits. If you screwed it together the other way, the roof would be too narrow, and the birdies would get wet.

We painted it blue coz that's the only colour we've got in at the moment! I'm sure the birds won't mind. There are plans for more bird-related stuff in the pipeline.

And while I'm on 'things made outside', here's a picture of our creation from a couple of weeks back:

I'm particularly pleased with the hat and the goatee :)

Tuesday 9 March 2010

Ooh ooh ooh.

I've just remember I haven't blogged about the thing I was meaning to blog about on this... So I'll try to remember to take some photos tomorrow (Joshua and I put it up on Sunday afternoon, and someone commented on it today!)

Friday 5 February 2010

Has bean bag, will blog.


Well, it's not the cushions I promised, neither is it the 'other thing' I mentioned in the last-but-one blog, but it is a bean bag.

Here's how:
Buy a whole loads of those minuscule white balls to put in bean bags.
Buy some end-of-line fabric (£2.99 a metre!).
Have a look at a bunch of bean bags and wonder which design is easiest.
Conclude it's the one with the least sewing.


(These are not precise measurements...)
Cut out two trapeziums (Base 90cm, one vertical side (i.e., the sides are at right-angles to the base) 65cm, the other 35 cm. This leaves about a 95cm diagonal at the top.)
The easiest way to do this is cut a rectangle 90cm by 100cm, then cut a diagonal line across it (make sure you cut it the right way) It would be much easier if I drew it, but I can't be bothered. These sides need to be sewn together back and front (not top and bottom!), so that the front is 35cm high, the back 65cm. (Obviously, you'll need to have the outside bits of the fabric (if applicable) facing each other. You'll notice from the photo how beautifully the fabric matches up at the seam.

Use your high school maths knowledge to work out the diameter of the circle needed for the top of your bean bag. (It's circumference divided by pi [pi is 3.14ish]) So if you've got a circumference of about 186 (which you would have if you double 95 and allow for a bit of seam) then you'd have a diameter of 60cm. Measure this out on the fabric (If you're like me, you'll spend ages cursing the fact that you bought a repeating fabric that's got the wrong distance between repeats and is thus a nightmare to figure out).
Pin the circle to the sides. I took three attempts at this, because I hadn't measured quite right, so I kept ending up with a big fold at the end of my pinning line. (Make sure you've pinned it the right way)
Sew the circle to the sides.

Wonder how you're going to do the bottom, which needs a zip.
Decide to do it by sewing a whole bunch of bits together and then chopping them into a circle (make sure it's the right size - it's pi time again!)
Spend about 40 minutes trying to figure out how to sew a zip in.
Figure out a way of doing it that probably isn't right, but seems to have worked anyhow. (I sewed two bits together, then sewed the zip onto the two bits, then unpicked the original seam so that the zip actually worked.)

(At this point my machine broke. I don't know what went wrong, but the thread kept gathering underneath and the machine made unhappy noises (it is 73 years old...). After reading the (73 year old and thus slightly dog-eared) manual and fiddling with the machine for about 20 minutes, I managed to stop it being broken. I wouldn't say I fixed it, as such ... but it lasted the rest of the job, and hopefully will live to sew another day.)

Sew the bottom to the rest (keep it all inside it)
I'd suggest undoing the zip before you sew the bottom to the sides. I didn't and then had to work out how to undo the zip, which was on the inside!

Admire your work.

Get loads of bean-bag filling and stick it in (I used a lining which I'd stolen from another bean-bag).

Wish you'd taken some 'during' photos.

Restock all the bean bags in the house with the leftover bean-bag filling.

Sit on your creation for a while and enjoy the extreme satisfaction.


Take some 'completed project' photos.

Blog it.

Monday 1 February 2010

A Pirate Ship

Thought I'd put this in this blog, just to be different... I made it, after all...

Requirements:
Two sofas,
A crazy three-year-old with a vivid imagination,
About ten minutes,
A weakening grip on sanity.
Yes, the transformation really doesn't take very long, and you can have your very own pirate ship in your very own lounge. You can see a picture of the outside (that's a sail on the top) and the inside (yes, they're my sock-clad feet there) here. If I were able to take a photo of myself (other than my feet), it would have been of me having just climbed in through the window (one at each end) of the ship and getting slightly stuck in the process.

You may recognise the sofas as being the ones already modelled in previous posts. They're wonderfully versatile.

Tuesday 19 January 2010

Get on your knees.


There are a couple of things from recent days to blog about, but I'll space them out, so it doesn't look like I just have creative phases ... (Not that they're particularly 'creative' as such, as they both followed instructions. Creating, yes, creative, not really!)
The first one is something I've been meaning to make for ages (years?). I only finally got around to going and getting the wood for it last week. It's a prayer stool :)
If you're wondering why it's on the bed, it's because, being pine, it didn't show up very well against the beige carpet!

Ingredients: (enough to serve 1 person at a time)
Plank of wood (smooth planed, unless you want splinters in your bum) 6 inches wide, about 32 long.  Choose a thickness of plank that you think will bear your weight...
Batten (square, 1/2 inch, about 12 inches long)
8 screws (I used reasonably lightweight 1inch ones - obviously if they're much longer they'll stick out the other side)
4 nails.
Wood glue.
Saw
Sandpaper
Hammer
Screwdriver (I confess I used the power tool rather than my fair hands)
Three-year-old son to help (optional)

Cut an 18 inch length off the wood. (This will be the 'seat' bit)
For the legs, I cut them 7 1/4 at the back and 6 1/2 at the front. (I'm sure you can work it out for yourself, but measure 6 1/2 inches then 7 1/4 on one edge of the face, and on the other edge measure 7 1/4 then 6 1/2. You'll have a sloping cut that creates two identical bits of wood) The precise lengths you'll want depends a bit on your shape - shorter/taller people may wish to vary, but I would have thought this would work for most. Mum's prayer stool, from which I stole the measurements (it's ok, I helped her make it years ago) is 6 1/2 and 7 inches.
At this point, my three-year-old helper (a.k.a 'Big Boy') went inside to watch telly. I sanded down some of the corners, so it's got a smoother finish, but that's pretty optional. I actually went in to sit with Big Boy whilst sanding, but got a very clear, "I can't hear the telly properly", so I left again.
You then need to construct it - I nailed the top into the legs before screwing, and applied wood glue at this point - I didn't use any in the battens.. (It's probably obvious, but make sure you have the legs the right way up (If it's not obvious, you want the right-angled edge to be on the floor, and the sloping edge to be at the top!!))
I then cut the batten at a slight angle, so that it follows the line of the legs, rather than sticking out at a jaunty angle).
Screw the battens into the top and legs.

If you want to, you could of course paint/varnish it. (Or carve your name and postcode in it, so if it's nicked it can find its way home). I think I'd do this to all the bits of wood before putting it together.

One last thing...

USE IT!

Wednesday 13 January 2010

One to amuse you.


Thought you might like this one.

Ingredients:
Leftover fabric (that's leftover from the leftover fabric used for the last project)
A heart to cut around (suggest wooden one rather than real one - much less messy)
A dead pillow that can be butchered.
Sewing machine etc., as in previous post.

Cut two hearts out of the fabric.
Worry about the fact that they seem to be different, despite the fact that you used the same 'template' for them both. Also worry about whether the fabric should have been a certain way up before you started.
Figure it doesn't really matter and pin around the edge. (Note, if you're using a fabric with a right side and a wrong side, make sure the right side is on the inside - don't worry, you'll see it again in a second)
Sew almost all the way around the edge, leaving about a 1 1/2 inch gap.
Turn the empty heart (?!) inside out (or inside in, actually) so that the seam is on the inside not the outside. (Though I guess there might be something vaguely 'trendy' about having the seam on the outside - seems to be all the range with t-shirts these days)
Rip bits out of the innards of your dead pillow (should probably have mentioned that a polyester one's perhaps easiest and least messy, but I'm sure others would do)
Jam as much stuffing into the heart as you can.
Hand sew (unless you're better with a sewing machine than me) the last 1 1/2 inches up, making sure that you've not got any guts spilling out through your seam.
Wrap the heart up and give it to a loved one. (Or, I suppose, anyone ... if you're into freaking people out)

Monday 4 January 2010

In no particular order...

Thought I'd start with this, as there's already a photo of it here.
Basically, at the request of mum, I made this (she asked for one, but didn't specifically ask me to make one). It required:
A sewing machine (or needle and thread, if you're not the machine type). For the record, mine is a singer sewing machine. Class no. 201K. It was a present to my granny on the occasion of her 21st birthday, which makes it an impressive 73 years old this year. And yes, it's electric.
Some fabric (slightly smaller than a tea towel)
Some elastic (I butchered a pair of boxer shorts, (sorry mum!) but I gather that the more conventional method is to buy the stuff). Two bits of elastic, to be precise.
Some pins (you can decide for yourself how many you need)
A bit of ribbon to hang it up with

Basically, you want the elastic to be about 1/2 to 2/3 as long as your fabric is wide (make sense?) e.g., if your fabric is 30cm/12in, you want the elastic to be about 15-20cm/6-8in. You need it to create a hole that is the right size to allow plastic bags to pass through, without being so big as to let them all drop out!
Pin your elastic to the top and bottom (the shorter sides, that is) of your bit of fabric. You probably want a pin at each end and one in the middle.
Sew the elastic to the fabric using the machine. To be honest, this was a bit of a faff, but I found that the 'grip' (sure there's a technical term for it) on the sewing machine was good enough for me to put the foot down on one end of the elastic and fabric, and then pull the elastic taut from the other end whilst sewing along the length. Do this for both bits of elastic!
Hem the ends (also tricky because of the elastic) by folding the fabric over the elastic and then fold again so both the elastic and then end of the fabric are hidden, and then sew along.
Sew the two sides together with a straight stitch, making sure that you have the fabric inside out, so the seam ends up on the inside.
Turn the whole thing the right way around.
Sew the ribbon into the inside of the top (the top is whichever end you want it to be...) I think I did this by hand, as I thought if would be easier than a machine.
Hang it up and marvel at your creation. (Trying to avoid looking at bits that don't quite match up, and wondering why you used yellow thread on a green and white fabric)

Good fun to make, satisfying too. And 'made to order'. Must ask mum for a report on its progress and functionality...

Simples.